

Single-page apps come with a variety of advantages for end-users, including good UX and better speed. With a progressive JavaScript framework like Vue.js, developers now have an excellent tool with which they can create effective and impactful single-page apps.
Created by a former Google employee, Evan You, Vue.js is a truly reactive and compiler-optimized rendering system that rarely needs manual optimization. It is a rich, versatile, and easily adoptable framework that builds on top of standard HTML, CSS, and JavaScript with intuitive API and excellent documentation.
If you are a developer who wants to create a single-page app (SPA), we suggest delving deep into Vue.js and writing a SPA using it to understand how Vue.js enables developers to build single-page apps.
This post is a tutorial that will help you grasp the basics of using Vue.js to build SPAs. For the sake of the tutorial, we will only discuss writing a client with Vue. Using the Vue framework is a straightforward affair, and with the right guidance and tools at your disposal, it can become even easier.
Using Vue.js To Build Single-Page Apps
Ideally, you should consider using Vue-cli if you’re jumpstarting a new project because you can begin the project with official project templates created by Vue. The platform also features several open-source Vue templates that you can put to use for a good start to any project.
The first order of business is to install Vue-cli as a global package:
$ npm install -g vue-cliOnce installed, initialize your project with any of the templates you decide to go for. For beginners, it’s better to use webpack-simple because it gives you enough of an idea to understand how things work.
$ vue init webpack-simple vue-spaAfter that, head to the vue-spa folder and run npm install in a terminal. You can run your application in the development mode after you finish installing the packages.
$ npm run devThe Template for Webpack-Simple
Familiarizing yourself with the structure of the template can help you get a good start. The webpack-simple template has a structure as follows:
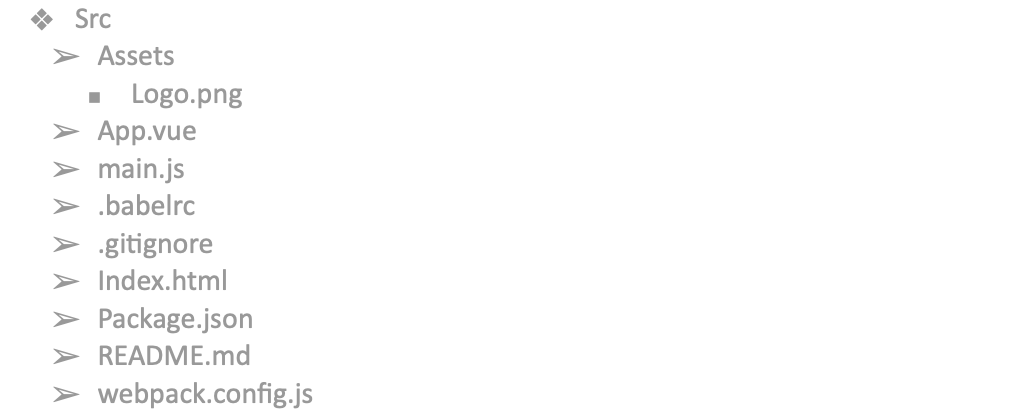
webpack-simple template structure
The index.html file contains a simple HTML markup including only the element identifier “app” in the body. A DOM generated by Vue will replace it and that’s why we recommend avoiding using body tag as a root element.
The main.jsfile in the src directory is the entry point for webpack and this is where you also import the Vue components. This is also where you have a root Vue instance with two properties. ‘el’ offers the Vue instance an already-existing DOM element for it to mount on. The other is a render function that generates DOM from App.vue.
You will code the primary part of your Vue app in App.vue. If it has a “.vue” extension, you should understand that it is a single-file vue component – a prominent Vue feature.
What Are Single File Components?
When you take a look at a .vue file, you will see three kinds of blocks: <template>, <script>, and a third optional block, <style>. The template, logics, and styles within a component are inherently coupled. Juxtaposing them makes that component easier to maintain while keeping it cohesive.
Making A Single-Page Application With Vue
For the sake of the tutorial, we will be creating a ‘Vue Blog’ in which we will have a header that has the name of the blog at the top. Towards the right, we’ll go with a fixed sidebar that displays the headings of all the blogs – a kind of table of contents. The rest of the page will be covered with a dynamic block that displays the particular blog itself.
| Single-Page App What is Lorem Ipsum? Lorem Ipsum is simply dummy text of the printing and typesetting industry. Lorem Ipsum has been the industry’s standard dummy text ever since the 1500s, when an unknown printer took a galley of type and scrambled it to make a type specimen book. It has survived not only five centuries, but also the leap into electronic typesetting, remaining essentially unchanged. | 1. What is Lorem Ipsum? 2. Lorem Ipsum is simply 3. dummy text of the printing 4. and typesetting industry. 5. Lorem Ipsum has been the 6. industry’s standard dummy 7. text ever since the 1500s, 8. when an unknown printer 9. took a galley of type 10. and scrambled it to make a type |
First Step
The first order of business is to do away with all the lines from App.vue that you don’t need based on your requirements.
<template>
  <div id="app">
    <header>
      <h1>Single-Page App</h1>
    </header>
    <main>
      <aside class="sidebar">
      </aside>
      <div class="content">
      </div>
    </main>
  </div>
</template>
Then, you need to create a Vue instance using the data property that you will place in the array with your posts. It will initially be empty but you will pull the data you receive from your server inside the array. Remember that once observed, you cannot add reactive properties to the root data object. Declaring all root-level reactive properties before making the Vue instance is always a better approach.
<script>
  export default {
    data () {
      return {
        posts: []
      }
    }
  }
</script>
As of this point, you will not have anything to display in your navigation bar. You need to get the data from your server through any HTTP client you’re comfortable with. Axios, native fetch, or even any Vue-resource could work. Let’s use Axios for the sake of the tutorial due to its simplicity.
Second Step
Next, you install the Axios
$ npm install --save-dev axiosImport Axios into a component app and create a method pullAllPosts(). To do that, you have to make a request to the server and set it to the property post. Call the method hook pulled() that will be called after you create the Vue instance and set up data observation.
import axios from 'axios'
export default {
  data () {
    return {
      posts: null,
      endpoint: 'https://abcdefgh.blahblahblah.com/posts/',
    }
  },

  pulled() {
    this.pullAllPosts();
  },

  methods: {
    pullAllPosts() {
      axios.get(this.endpoint)
        .then(response => {
          this.posts = response.data;
        })
        .catch(error => {
          console.log('-----error-------');
          console.log(error);
        })
    }
  }
}
After this, display the main headers of all the blogs on the sidebar.
<aside class="sidebar">
  <div v-for="post in posts">
    {{ post.title }}
  </div>
</aside>
Until now, we have displayed the names for all the blog posts, but you will won’t see the entire posts. The next step will outline showing the entire blog in the main section based on a title from the sidebar while ensuring that each blog post will be available via its unique address.
Third Step
Let’s use the official Vue library vue-router to achieve this. Let’s install the package so you can implement displaying the whole blog in the main section using a title from the sidebar.
$ npm install --save-dev vue-routerGo back to the main.js file to configure the router and define the settings for your router, then add it to the Vue instance.
import Vue from 'vue'
import Router from 'vue-router'
import App from './App.vue'
import Post from './components/Post.vue'
import Hello from './components/Hello.vue'
Vue.use(Router)

const router = new Router({
 routes: [
   {
     path: '/',
     name:'home',
     component: Hello,
   },
   {
     path: '/post/:id',
     name:'post',
     component: Post,
     props: true,
   },
 ]
})

new Vue({
 el: '#app',
 render: h => h(App),
 router
})
Specify the component that should be rendered on a particular path in the route settings. You don’t need to set the path for every post since the only component Post.vue will take on the task to render each post. All you need to do is set a dynamic path for it.
path: '/post/:id'The path above has a dynamic segment :id that identifies the particularities of your post. Therefore, we have access to this part in the component Post through this.$route.params.id. The drawback with using $route in your component is that it reduces the flexibility of the component because you can use it only on specific URLs. A better alternative might be to use the option props and set it to true because it will set $route.params as the component Post props.
You can return to your application and add some more lines to the template after creating the router.
<main>
  <aside class="sidebar">
    <router-link
        v-for="post in posts"
        active-class="is-active"
        class="link"
        :to="{ name: 'post', params: { id: post.id } }">
      {{post.id}}. {{post.title}}
    </router-link>
  </aside>
  <div class="content">
    <router-view></router-view>
  </div>
</main>
<router-link> and <router-view> are the two components of vue-router. <router-link> is the component that lets the app’s users navigate in the router-enabled app. <router-view> is a functional component that takes on the responsibility of rendering a matched component for a specified path.
Fourth Step
The only step left now is to show the content in the blog post. Head back to the Post.vue file because that’s where you will create a simple template.
<template lang="html">
  <div class="post" v-if="post">
    <h1 class="post__title">{{ post.title }}</h1>
    <p class="post__body">{{ post.body }}</p>
    <p class="post__id">{{ post.id }}</p>
  </div>
</template>
After that, you need to set the Vue instance settings for the component. You will notice that everything in this part is like the settings to display all posts. Declare the option props using variable id to get the number of your post. After that, you should define the data object in a manner similar to how it is in App.vue:
import axios from 'axios';
export default {
  props: ['id'],
  data() {
    return {
      post: null,
      endpoint: 'https://abcdefgh.blahblahblah.com/posts/',
    }
  }
}
After this, create the method pullPost(), which you will use to get a single post through an identifier and call it in the pulled() hook.
methods: {
  pullPost(id) {
    axios(this.endpoint + id)
      .then(response => {
        this.post = response.data
      })
      .catch( error => {
        console.log(error)
      })
  }
},

created() {
  this.pullPost(this.id);
},
If you run the application at this point, you will only see the first post that was rendered. We have the same component to render the different posts and Vue doesn’t need to recreate it and waste excess resources. It also means that the lifecycle hooks of the component won’t be called. Of course, you want to correct the issue so you can view the different posts, and that requires setting a watcher for the $route object.
Run it now, and it should work exactly how you’d like. Run npm run build on your terminal to get a production version of the app you’ve just created.